 Since my Artisanal Bread course at the French Culinary Institute in November I have been baking at home with varying degrees of success. The best measure available is that since November 7th I have not bought any bread
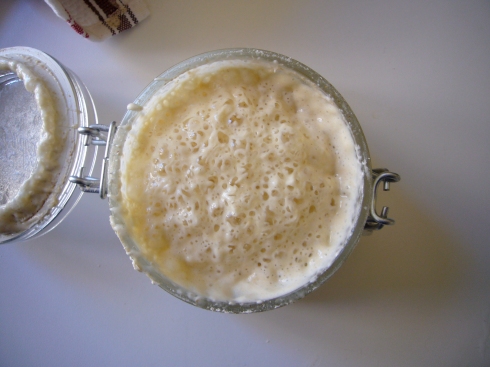
My first forays into baking were based on straightforward yeast recipes learnt in class, but I knew I also wanted to have a go at the more complicated sourdough varieties in Dan Lepard’s The Handmade Loaf (Thanks Natasha). My first attempt at the levain (above) proved to be somewhat ill-timed. The process takes 6 days preparation before it is ready to begin baking, having got to the sixth day I realised that the recipe basically requires you to be at home all day, and I was not at a point in my baking relationship where I could commit.
Above was my aborted first attempt, I obviously do not know how it would have worked out, however I don’t think it was quite right. I didn’t really pay strict attention to the storage temperature of the levain and kept it at well above the prescribed (20c) room temperature, hence the many bubbles and constant levain flows escaping the Kilner jar.
The second attempt was with the experience of baking class, and while we only touched very briefly on sourdough (as this was another class altogether) I did have some key knowledge that was previously lacking.
If you are going to attempt home baking I would recommend the following tools. Baking stone, oven thermometer, probe thermometer, dough scraper and good quality electric scales. This time around with the advantage of the probe thermometer I was able to keep an accurate read on the temperature of the water I was adding, and the temperature of the dough, ensuring optimum conditions.
My first actual sourdough out of the oven was definitely of a homemade style.
 It was slightly burnt, but had excellent flavour. The bread developed an almost pointed pyramid shape for a couple of reasons. Firstly the oven being too hot, and also because I had under floured the towel (couch) that the dough had been in for its final proof. This meant I had to over handle the dough to release it, knocking a lot of the air out.
 Consequently the heat of the oven had to do all the rising (this can be seen in the picture where the dough is almost flat) and forced the peak up. The result of this can be seen in the large holes at the top half of the bread, whereas the bottom has a better structure.
Still effort number 2 certainly looked like bread and tasted pretty good.
Effort number 3 (BELOW) was a real success. I learnt from the previous days mistake and ensured a really good covering of flour on the ‘couche’. It was still a struggle to free the dough but less so. The result, much more even aeration and rise while maintaining really good crust and flavour. My normal test for sourdough holes is that if you can make a sandwich without the filling coming through then it’s good.
 I was very pleased with this bread so froze one and kept the other for instant gratification…..
I took a day off and then decided to play around with the recipe a little so made some mini baguette style breads and then went even further off piste by adapting the recipe to make a light caraway seed rye.
For the baguettes I followed the original recipe only changing the shaping process before the final 4 hour rise. The rye was an experiment for which I made up a different recipe. I used the same mix initially as with the plain sourdough but added some rye flour, water and toasted caraway seed. I was going for approximately a 15% rye/white flour mix. After my usual burning of the first lot of caraway I added all the ingredients to the dough and fully incorporated, again following the same steps until the final rise where I shaped into a batard.
Really good results all around.
 I used this bread for dinner. Char-grilled chicken with homemade pesto mayonnaise, red onion and rocket on sourdough….Absolutely delicious!!!


 The flavour of the rye bread was a little off, it needed more salt and less caraway seeds, and asthetically could have done with a light egg glaze, but still very edible and perfect for tuna sandwiches, or better still salt beef…..
Click on the image to enlarge for recipe and method.


You are really speeding through sourdough! I still find it hard to commit and still haven’t gotten round to buying a baking stone
Have you eaten here…http://www.konnopke-imbiss.de/ according to the Guardian the best Currywurst in the world?
http://www.guardian.co.uk/lifeandstyle/2009/sep/13/best-foods-in-the-world
Yummy! I look forward to sampling your baking. We went to Peter gordon’s new restaurant in covent garden this morning – my sourdough toast was very good but yours looks better x